Sunday, August 24, 2014
L.A. Girl Glazed Lip Paint Spring 2014.
Det er flere merker som har kommet ut med lignende produkter, både Milani og Too Faced. Både Milani og Too Faced er mye dyrere enn L.A Girl så jeg ville teste den billige versjonen.
Flytende lipstick er ikke nytt under kjolen, men sterke farger i sleek tubeform er.
L.A Girl kommer med 6 farger:
Blushing - a medium mauve.
Babydoll - a cool-toned bubblegum pink.
Hot Mess - a medium coral.
Bombshell - a bright fuchsia.
Coy - a medium lavender.
Pin-Up - a bright cool-toned red.
Disse minner faktisk veldig om OCC Lip Tar om du kjenner det produktet. Meaning svært pigmentert og du trenger svært lite produkt for å få total coverage. Det betyr også at om du bruker for mye vil du ende opp med skikkelig pulemunn. Less is def. more. Jeg har ikke prøvd Milani eller Too Faced sine, men de er ifølge teh interwebz en helt annen tekstur.
Jeg har testet disse i noen dager, og jeg er meget så happy. Du bør påføre disse med en lip brush, eller om du ønsker en mere stained lip kan du påføre med finger. Jeg har brukt produktet rett fra tuben men det gir deg ikke en streng lipline. Og vi liker det strengt.
Jeg kan faktisk bruke alle som en, Baybydoll er den som ikke vil bli brukt fordi den er for lys rosa. Men alle de andre er kalde i undertonen og perfekt for mitt bleike tryne. Coy er dritsexy. Hot Mess minner meg om Illamasqua intense lip gloss i Mistress. En farge som ser helt loco ut før man får den på, men da er den en killer kald coral. Win.
Med tanke på hvor lite produkt som trengs vil du ha disse i år og dag. Og kjøper du alle 6 har du farger til alle anledninger og til alle humør. Jeg anbefaler de varmt.
Og hva koster disse, mon tro?
$4 pr stk.
Jeg kjøpte alle 6 via Ebay for kr 98,- ink 55 kr shipping. (seller lahappysavings)
Jeg bare nevner at Lip Tars koster $18 or stk....
Cruelty free.
Saturday, July 26, 2014
Ellis Faas - Lights
Ellis Faas is a high end band, the first time I saw this product online I went on a crazed manhunt to get my hans on "LightE306" . So....is it as kool as I thought it would be? Read on, read on!
Eliis Faas products come in sleek packinging, in chrome sylinders and you can fit them in a chrome tube and store them there. Products cover lips eyes and face and the idea is that everything has the same sylinder shape and makes for a system to be easily stored. It's all very sci-fi and modern looking. And we digg that. Make sure to check out the website as its pretty badass.
The creamy eyes Lights E306 is a liquid eyeshadow that sets on your eyes, and the color I have is Holographic Bordeaux.These can be addes as a highlight to your eyes or used on their own. They do not feel sticky or drying. It's a twist/click product and make sure you pay close attention, because I over-clicked it and made a slight mess as pic below show. Mine had some bent hairs, didnt expect that.
The product applies evenly across the lid, dabb it with fingetip to get that metallic shine. I have great results blending this out with a blendig brush too.
The color i have is a duochrome red/green, think MAC Club or any of the billion dupes of that eyeshadow. The combo is great for my green eyes, as the red gived you that "living dead" look and the green adds life.
I really do adore this, the downside is that its not watherproof. And it does not stay on until bedtime. Its not one of those "this product will stay put even through nuclear war"- kinda product. But its stunning, very expencive looking, and the quality is very good. I reach for this often, its quick and easy and ones applied, it looks as if you've used 3-4 different shades/products. But noooo.
It's an expencive thing to have in your makeup bag, it's $43
No scent. No taste. No animal testing.
Eliis Faas products come in sleek packinging, in chrome sylinders and you can fit them in a chrome tube and store them there. Products cover lips eyes and face and the idea is that everything has the same sylinder shape and makes for a system to be easily stored. It's all very sci-fi and modern looking. And we digg that. Make sure to check out the website as its pretty badass.
| Kool looking, huh? |
The creamy eyes Lights E306 is a liquid eyeshadow that sets on your eyes, and the color I have is Holographic Bordeaux.These can be addes as a highlight to your eyes or used on their own. They do not feel sticky or drying. It's a twist/click product and make sure you pay close attention, because I over-clicked it and made a slight mess as pic below show. Mine had some bent hairs, didnt expect that.
The product applies evenly across the lid, dabb it with fingetip to get that metallic shine. I have great results blending this out with a blendig brush too.
| Here is the green/teal shift in color. |
The color i have is a duochrome red/green, think MAC Club or any of the billion dupes of that eyeshadow. The combo is great for my green eyes, as the red gived you that "living dead" look and the green adds life.
| Here you see the red/brown color |
I really do adore this, the downside is that its not watherproof. And it does not stay on until bedtime. Its not one of those "this product will stay put even through nuclear war"- kinda product. But its stunning, very expencive looking, and the quality is very good. I reach for this often, its quick and easy and ones applied, it looks as if you've used 3-4 different shades/products. But noooo.
It's an expencive thing to have in your makeup bag, it's $43
No scent. No taste. No animal testing.
Saturday, June 21, 2014
PrettyPots -
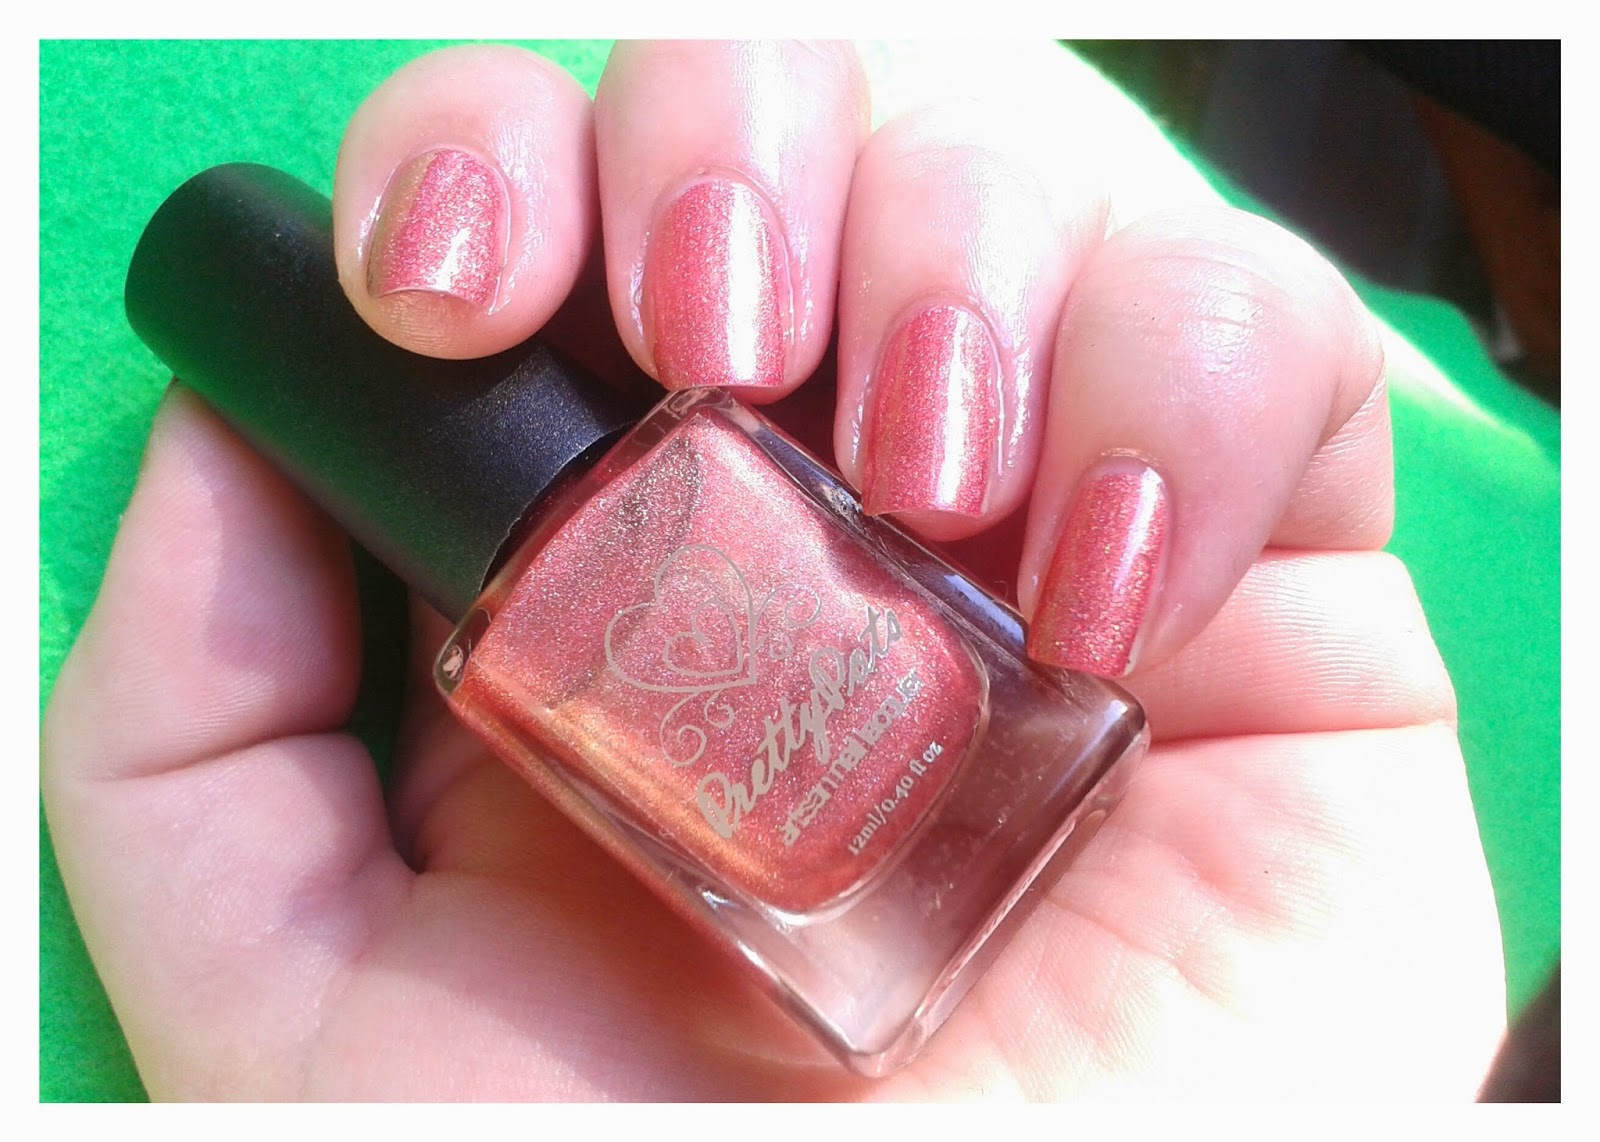
PrettyPots polish was new to me. But seeing swatches of Orange Chiffon made me jump on the PrettyPots train! A stunning coral with holo linear sparkle godness!
And can we have a moment of drooling over the packaging!? How flipping kool is that?!
Goes on like a dream, only takes two coats to get a good coverage, smooth and problemfree.
Slight green shimmer, see? I have such a crush on contrasting shimmer. This polish is way more complex than my cam can capture sadly.
Hard to capture the holo effect but take a closer look at that pinky!! Wooo!
Kool thing with this polish is that is has a holo effect even when it's not in direct sunlight. Thats bad ass.
I will mos def buy more from this brand, after all I am an addict, right?
You can get you hands on this via NorwayNails and using SVARTEBLOGGEN10 gives you 10% off.
3free and cruelty free!
And can we have a moment of drooling over the packaging!? How flipping kool is that?!
| So.Flipping.kool!! |
Goes on like a dream, only takes two coats to get a good coverage, smooth and problemfree.
Slight green shimmer, see? I have such a crush on contrasting shimmer. This polish is way more complex than my cam can capture sadly.
Hard to capture the holo effect but take a closer look at that pinky!! Wooo!
Kool thing with this polish is that is has a holo effect even when it's not in direct sunlight. Thats bad ass.
I will mos def buy more from this brand, after all I am an addict, right?
You can get you hands on this via NorwayNails and using SVARTEBLOGGEN10 gives you 10% off.
3free and cruelty free!
Tuesday, June 17, 2014
Pixiwoo-paletter
Tja.
Alle elsker å hate Pixiwoo, jeg mener de har talent ut av ræven - spesielt Sam. Sminkekostene er av kanonkvalitet, så jeg ville teste palettene de nettopp kom ut med. Er jeg imponert? Well, am I?
Det er to paletter, begge kommer med 2 miniglosser, en gel liner, en blush, en creme highlighter og 4 øyenskygger.
Hard papp, plastluke i lokket, magentisk åpne/lukke, nada speil. Kul design i sort.
I tillegg kommer de med en liten detailer brush. Slikt liker vi jo.
| Night Owl Makeup Kit |
| Modern Natural Makeup Kit |
| Night Owl Makeup Kit |
Disse er limited edition, og koster $25 via Real Techniques.
Sunday, June 15, 2014
Nailstation - Eletric shopper.
Long time no read, huh?
For mye jobb og en jævlig intens eksamensperiode har, selvsagt, vært fokus fremfor jåleri.
Nå har ting roet seg ned litt og snart er det 3 uker ferie. Vil nok bli noen poster fremover.
Om dere er slemme nok.
Nailstation er et av mine fav brands, de har så utrolig klare farger. Eletric shopper er nok en fav i rekken.
En klar, himmelblå crelly som dekker på to strøk. Nada glitter, shimmer eller annet steæsj. Bare en stunning blå farge som garantert vil kle de fleste hudtoner.
Lakken er lett å påføre, den er litt tynnere enn en creme siden det er en crelly. Mitt tips er tynt første strøk, tykkere på andre strøk.
Denne tørker en tanke mørkere enn i flasken, men minimalt. Penselen er god, flasken er pen, lakken er kick ass. In short: Buy it.
Eletric Shopper kan kjøpes via Norway Nails og bruker du SVARTEBLOGGEN10 får du 10% rabatt.
Yeah.
Denne lakken er kjøpt av moi.
3free.
Saturday, May 3, 2014
Indigo Bananas again!
Got 3 more of the kick ass indie brand Indigo Bananas. There just blow my mind and are so unique and kool.
And with that said, very hard to capture on photo. Grrr.
It is what it is, addicts! But trust me, these really do need a place in your collection.
Will post the first two now.
First one is Rez, it's a grey & black glitter, purple duochrome base. It's a stunner. Looks like granit indoors but flashes green and lillac when light hits it. In the sun or in direct light this has the most amazing duochrome green and lillac....and the texture almost makes me want to call it a textured polish. This is badass with no top coat too. I did use one coat of HK but that didnt do it any favours, so I used my normal SV on top. Gives it a 3D-effect really. Applies lovely, go in with a thik first coat, let dry and then a medium second coat. Thats all you need for total coverage. So flipping kool!
| Shitty bottle shoot. Deal. |
| See how it shifts? Gah. |
| The silver glitter makes it so galaxy like. |
| Strong green shift. |
Next is Enchante - red & black jelly - this GLOWS blue in the dark! I had forgotten that this is a glow in the dark polish until I did this post actually. Cant wait to go to bed now. Hah. This is a very bright red jelly with black glitter. I used 3 coats in the pics and that is more than enough. The black glitter gives it some depth too. So squishy and fun! Like a strawberry smoothy or jam. The glitter applies perfect, no dabbing needed really. Give it a little time before the second coat. I am really loving this one.
| Squishy! |
| I know you just want to bite my fingers, they look so jummy. o_O |
| Super kool in your face red. |
You can get your hands on these via Indigo Bananas and they cost $6 for small and $10 for full size bottle.
Check her out over at Facebook. She is super nice and her customer service is outstanding.
Tuesday, April 8, 2014
Reversed stamping - The Cut Up.
Reversed stamping is a bitch.
For me at least it is. Making the decal is easy, placing it making it look good, not fun at all.
There are a few different ways of doing it, and you can google that yourself. I'm not Wikipedia.
Anyways.
Today I wanted to try something different.
But before I get into that, let me explain reversed stamping to any n00bs out there:
You need:
* A plastic cover to paint the polish on
* Polish (doh)
* Stamping equipment - I recommend plates with bold patterns.
* Top coat.
* Tweezer.
* Scissors.
* Patience.
You start by drawing a square on the plastic cover, this makes it more easy to see where to stamp and peel afterwards. Then paint in a coat of clear top coat in the square and let dry.
Stamp over the clear top coat and let dry. Now you can add colors where you want using a brush or a dotting tool. You let that dry and add another coat of clear top coat over the design (optional)
Let dry. Once dry, yet not totally dry let it still be kinda soft to the touch, peel it off with tweezers. Start in the corners and work your way in. Cut the now hand made decal to fit your nail, add a little clear top coat on the nail to help the decal stick. Pat gently with an orange stick or similar. Add a coat of top coat, let dry and you are done.
| Ignore the white robots, my plastic sheet happen to have robots on it. Stamping done! |
| Add color where you want it. |
| Peel off! |
What I did is a little different. I followed the normal steps up until the stamping. Once the stamping was dry, I painted the whole square with solid colored nail polish. Once dry, I peeled it off and flipped it. That way the pattern is visible from the front, and the back is a bright color. I then cut it up into different shapes, and placed it on the nail as a collage. I totally digg the result and its so much more easy to do.
| Cut it up! Any shape you want! No rules! |
| Mixing colors and patterns. |
| Here I added a coat of glitter. |
| And then a coat of creme polish over it all. |
| Pretty sweet looking, huh? |
Just imagine all the different ways you can do this, use a hole puncher for circles, pain the square in glitter, combine colors and patterns....just go with the flow!
And for those of you who care....the reason why I named this mani Cut Up is all because of William S. Burroughs.
And the lovely GenesisP-Orridge of course.
"Cut word lines — Cut music lines — Smash the control images — Smash the control machine — Burn the books — Kill the priests — Kill! Kill! Kill!"
Subscribe to:
Posts (Atom)